Prototyping with Clay. What if?

The Advanced 3D Design were assigned to create a product that they felt could improve their teenage lives. Students had to write the purpose of such product, create sketches, and discuss functionality. Below are some examples of what they came up with. 


Introducing the Portable Powered Outlet

My product I did is a solar and LED powered outlet. On the top it takes in solar energy and it also takes in LED lighting. In the front it has two outlets you can plug into, it also has a place where you can see how full it is. On the back it has a concave part, that’s for hanging it on things. On the lower part of the back it has buttons where you can turn on/use the LED or solar energy, there’s also an off button where you can shut off the energy for whole thing. On one of the sides it has a place where you can store small things.


Introducing the Panhou Planter

A small pot planter that also functions as a storage unit.  A drainage hole is integrated to the bottom of the pot so as to not stress the plant out with too much water. The top drawer functions as a large unit of storage for larger items that may fit in the palm of a child’s hand. The bottom drawer consists of two shallower, half units. These two compartments may be used to store seeds that are frequently lost. Each drawer has attached onto it magenta and pink colored leaves to be used as handles for opening and closing.
The product is a light gray color, but hints of lilac purple show when looked at the right way. The top of the product is designed with organic flower and vine shapes. Along the outer walls of the product are indented designs that relate to plants and gardening.

Introducing Maddie’s Marvelous Mug

Maddie’s Marvelous Mug is the name of my invention. I created this mug to save people time so they can do more important things instead of making their favorite drink hot or cold. When you’re at work wouldn’t it be nice to have a cup of coffee that stayed warm all day? After a long run wouldn’t it be nice for your water or chocolate milk to stay cold for a long time? With my mug that is exactly what happens. 
Pick up the warm colored side pointing up and your drink is automatically warm! If you pick up the opposite side with cool colors pointing down, your drink will automatically be cold! My product will save you time and energy. 

Abstract Expressionist paintings by Drawing/Painting II

Drawing/Painting II students spent a couple weeks learning about Abstract Expressionism and the works by MAS artist, Joe Bussell. As a result of their research they were to create three (3) large scale paintings using non-traditional tools such as a putty knife. Below is a snapshot of their work. In addition, students had the opportunity to Skype with the artist.


A Reflection by Allison N

I just sort of went for it. When I started the first painting, I had no clear idea in mind, I just sort of started putting paint on the paper and it went from there. The only thing I had planned was the colors, each of the paintings have a color scheme, they aren’t just random colors thrown on the page, they all have something in common. The first painting was different shades of a lavender-purple sort of color and the last two were three pastel colors, pink, blue, and yellow. I think my paintings in particular are unique because of the colors I;ve chose, I think it gives off a more ‘playful’ and ‘lightness’ sort of feel.

I actually really enjoyed using the palette knife, it was surprisingly satisfying, the way the paint glided. I think it created a nice blend when you used multiple colors, and sometimes layered the colors with just a single stroke.

I think I created a overall feel pretty well. Each painting, to me anyway, gives off a certain feeling, for example, the first one I did gives off a feeling of motion, two things responding together as I’d put it. I think I used the color element of this project to my advantage, I wanted to used colors that would go well with each other, that I knew wouldn’t give an ugly color if I mixed them together enough. I used geometric shapes for my third painting, which was a technique that was suggested.

I knew right away that I wanted one of the paintings to look as if two different ‘forces’ were responding to each other in some way, so the first painting I did was planned. The second painting was sort of on a whim, I put a line going through the entire thing and kind of went from there. The third painting was also sort of spontaneous, though I wanted it to have clean, straight lines, which I did achieve.

I only used one, and that was a pencil. I didn’t use it a big way, I mainly used both ends to make large circles and well as smaller circles and then I made small groupings of them scattered in particular places that I’d picked. Since the painting I had used this tool for was so geometric and clean, I wanted to use to circles and dots to create contrast between the two opposite shapes.

GALLERY

Celebrate Youth Art Month

Did you know that March is Youth Art Month? 

Congratulations to the following art students. These students will be representing the Sheboygan North High art department in Madison and in Sheboygan. 

In Sheboygan the following students’ work has been selected to participate in the John Michael Kohler Arts Center’s Youth Art Month Celebration. They are Elena B, Elena K, Maddie L, Tou V (teacher Ms. Mattern) and Allison N, Emma A, Gabe L, Arthur L, and Tyler G (teacher Mr. Juarez).  There is a public reception on March 5th from 11am – 3pm at JMKAC, 608 New York Avenue in Sheboygan.

In Madison the following students will be exhibiting their art at the Wisconsin Art Education Association Youth Art Month Celebration at the State Capitol. They are Elizabeth, Jenny, Emma (teacher Ms. Mattern) and Julia A, Rita D, and Allison N (teacher Mr. Juarez). There is a public reception on March 31st from 12-1pm at the Rotunda, 2 E Main St, Madison, WI 53703.

About Youth Art Month

Source: SchoolArts Magazine, March 2017


yamscholastic

Photo credit: Frank Juarez

Interview with Artist – Justin Thao, NHS art alumnus (2010)

This month we had NHS art alumnus and artist, Justin Thao visit North High to share his art, influences, and process with our students. The questions below were provided by the Advanced 3D Design students. 

img_5233-1024x533

North High Art Dept: Do you create your own papers?

Justin Thao: As a designer, we are trained to understand the overall process of developing an idea into a marketable product. I am currently not making my own paper just in case I have to mass produce my work to supply demand. But in the long run I am considering making my own paper to give the piece more value and innovative feature. But I do creative my own graphic patterns, which I can print in my room.

NHAD: If you make a wrong crease, do you start all over?

JT: People underestimate how important it is to fail. I have made so many bad creases over all in my life that I just throw them away. But there are some that I keep so that I may be able to recreate those folds and hopefully find something better. Most of my innovative origami pieces are created by making random creases.

NHAD: At what age did you realize what you were really passionate about?

JT: I realized that I was good at folding origami back in Elementary school. It all just came naturally to me. I understood the fundamentals of folding paper but I merely took it as a hobby. Beginning my journey as an artist in my freshman year at North High in Mr. Juarez’s class was the initiation of my art/design career. Even though I did not know where art would take me, I took a leap of faith and trusted in what I was good at. Through long hours, hard effort, and concentrated focus, I am able to find the purpose of my skills.

img_5345-640x422

NHAD: How did you come up with your designs?

JT: They are all generated by accident. Let me explain. With a sense of direction and knowledge of the kind of folds needed to create a desired look or functionality, I was able to find interesting folding features. It’s like digging for gold and suddenly you find gold after hours of searching. But of course as I am folding paper, I am always keeping a watching eye on how the paper evolves and learning what it can do. Through several experiments and understanding of the folding designs, I am able to create these innovative origami pieces.

NHAD: How long do you take to work on your designs?

JT: Many of my work take either several months or years. Some of my simple designs may take a day to make, but those type of simple work do not evolve much. Some of my work like the mushroom lamp is taking me 2 years overall because it started when I accidentely made the smaller mushroom origami more than 2 years ago. Then recently this year I just started to push this mushroom origami into a valuable product. Some of my work do take a couple of months or years, but I do have smaller projects on the side that occupy my time. I am always working on something.

NHAD: How long does it take you to fold the papers?

JT: Some of the origami pieces may take 10 minutes and they usually do not turn into anything special. But the ones that take more than 30 minutes usually turn out well. One of my project back then involved folding a gear out of paper. After taking 2 to 3 hours to figure out the patterns, making the final product took me nearly an hour just to fold. No matter how long it takes for you to do your own work, you need the passion to endure the process because without passion, you will find yourself tired and dragging your feet.

img_5475-1280x853-1

NHAD: What courses did you take in college?

JT: I did take some drawing courses where we drew naked figures all day. I involved myself with sculpture to learn how to free the creative side of myself because my design courses are about following guidelines and learning how to cope with limited creativity. I knew that learning how to be free and creative while understanding how to be precise and conservative was the answer to being a successful designer. Now these type of courses are really helpful in developing my business where I am able to push the boundaries while meeting customer satisfaction.

NHAD: Did Mr. Juarez have any influence on you at all?

JT: Mr. Juarez had a lot of influences on me. He is the one who took me under his wing and taught me the foundation of art. He guided me and corrected me when I needed it. His was even generous enough to help give me assignments to enhance my portfolio for entering Milwaukee Institute of Art and Design college.

NHAD: How did you learn to do Origami?

JT: I learned through reading origami books back when I was in high school. I had no one to teach me and there weren’t many out there nearby that could teach me. So I relied on myself through hard effort and curiosity to learn it all by myself. Once I learned how to fold some of the generic origami folds, I quickly became bored. Most of them to me were either too complicated and pointless or simple and meaningless. I am always hungry for interesting origami designs but there are way too few of them out that that can satisfy my thirst. Instead of relying on the chance of finding something, I would create them instead in order to satisfy my thirst.

NHAD: What made you start your own Origami business?

img_3355

JT: There were many reasons why I decided to start my own origami business, but here are a few of them:

  • My passion for origami became overwhelming and started to inspired everything I designed.
  • Having my own business and my own successful line of product is the only to prove to other larger companies that there is value within origami. Most people see it as an arts and craft and nothing more valuable than that.
  • Pushing my own ideas to the market is the only way I can do what I want without having larger companies control and change the ideas into something they want it to be.
  • Having the freedom to design anything I want and see it out in the market is truly satisfying.

NHAD: Do you ever get discouraged and if you do, how do you overcome it?

JT: There are always people out there who do not believe in what I am doing. Even my own family seem like they support me, but the truth is they do not. I knew before I started this path as an entrepreneur is that it is very important for me to believe in myself. If my faith in my own work is little and gentle, then it would be easy for others to break it. To stand strong against others even when I am the only one is necessary for success. But of course it is very important to be realistic with yourself and see the potential of your own work. To overcome the people who discourage my work and my business, I had to learn how to cope with my own way of thinking: to guard my mind and the kind of negative thinking that would cripple my business while being realistic all at the same time.

How Does Art Unite Us

Drawing Intensive students were given the task of creating an 18″x24″ art advocacy poster addressing, “How does art unite us”. Students chose their own medium/a to turn their idea into reality. Each poster shares how they view art and their lives. 

The above prompt was issued by SchoolArts Magazine as part of an annual art advocacy poster design challenge. 

img_2163

Sheboygan North High IMC

Muralin’ with Summer School Art Kids

This week a group of middle/high school art students will be creating a 4 foot by 8 foot painting welcoming visitors to the Sheboygan Area School District. This mural will be installed on the 3rd floor stairwell inside the administration building, 803 Virginia Avenue in Sheboygan. 

IMG_8038

Finished Mural

Here are images of their creative process. This process involved designing, selecting, finalizing, and painting their contributions to to the mural. Also, part of the process was to edit the painting to reach the desired result of this collaborative project. Students worked independently as well as in pairs and/or groups. 

A Qualitative Research Study of Arts Education and its’ Impact on Post-Secondary Success. Written by Jenny Sturchio.

This past school year I had the opportunity to work with Jenny Sturchio. She is a grad student at Wisconsin Lutheran College in Milwaukee. Her ideas for her Capstone Final was to research how secondary art education impacts post-secondary success. The Sheboygan North High Art Department was one of her subjects for this research. I found it interesting to read her perspective on secondary art education and her correlations to post-secondary education. It is always neat to read what others think about the arts programming, activities, and relationships that exist within a public high school art program.

Feel free to download this PDF. Courtesy of Jenny Sturchio. 

Here are some excerpts from her research. 

“I find we are presented with material in a very linear way and are expected to understand it in that way as well. By participating in the arts, it has given me the chance to explore ideas and come to the conclusions in a more fluid manner. Having space to work through things abstractly has been beneficial for someone with a right brain way of thinking” (Answer from survey participant, 2016.)

“By being involved in the arts, I was able to find my passion. Being exposed to and given the chance to dabble in artistic curriculum, it opened up doors that would not have been possible otherwise. In a society where math and science are deemed the only suitably successful careers, including arts is a more holistic approach at education. Art has given me more ways to problem solve, and overall another perspective to walk through the world with. I think it is important to keep the arts in secondary education because that is how we keep it in post-secondary, which is important in creating innovators of the world” (Answer from survey participant, 2016.)

“When dealing with a struggling student they refer to creative teaching techniques to create a platform for the student to find success”.

“Not only do they [teachers] consult with the art department for their own classroom integration, but it is observed that arts-active students are more deeply engaged in classroom activities than those who are not”.

“My recommendation would be for high schools to provide professional development for their teachers that covers arts-integrated education”. – Jenny Sturchio

About

J.Sturchio. A Qualitative Research Study of Arts Education and its’ Impact on Post-Secondary Success: This narrative research project was completed in partial fulfillment of the requirements for a Master of Arts in Education degree for the College of Adult and Graduate Studies at Wisconsin Lutheran College, Milwaukee, WI. 50pps.

Feel free to download this PDF. Courtesy of Jenny Sturchio. 

AP Studio Art Portfolios 2016

This school year, 2015-2016, two NHS art students worked on their AP Studio Art portfolios. Both students communicated their intent through varied media such as collage, markers, paint, and artistic vision. These works are on display in the Lower Level from May 18 – June 1, 2016. 

The students arrive in AP Studio Art with a solid foundation in the arts and with breadth pieces of art completed from which to choose. Since AP students have had substantial experience in direct formal art making instruction, the AP class instruction is structured more like a college-level, independent study course where the student and instructor confer to identify an area of concentration for further development based on the student’s strengths, skills, and interests, for example, portraiture, landscapes, abstractions, illustration, and so forth.

Ashley

I am a senior at North High School. I am currently in AP Studio Art and my studio works consists of photographs I captured in the past few years that have a special meaning to me. My artwork tends to focus on nature, and with each body of work, I strive to communicate a variety of emotions to put together a unique portfolio. I used a method called Zentangle to focus specifically on the movement in each piece. I emphasized this element through the use of vibrant lines and the use of value and contrast. Through the different shades and textures, I wanted to tell a different story of my life through the emotions each piece portrayed. Each artwork is a building block that represents a part of my life and what makes me unique as a person.  


Mikayla

The inspiration for most of the pieces comes from fairytales. My intention was to take a happy fairytale and distort it in a way that gives it a different or darker meaning.  The overall feeling of each piece leaves the viewer to feel uneasy and a sense of mystery and also a desire to figure out what each piece means. These pieces all hold a story behind them, creating an even deeper meaning.  I experimented with acrylics and collage and even a combination of the two. I feel as though collage creates a deeper contrast and help the viewer form a more solid idea of the work. I also included one piece that does not fit the fairytale theme, “Even The Mountains Have a Song,” for fun and to display that in the midst of creating one theme, random pieces art can create themselves without any intention of them being there.

Design it Yourself Gallery Project: A deeper look into the 365 Artists 365 Days Project

Appleton art teacher, Elyse Lucas collaborated with Kate Mothes of Young Space inspires high school art students to research, collaborate, and design their own gallery. Mr. Juarez’s 365 Artists 365 Days Project provided students with a list of artists whose works were explored for the curation of the exhibitions that were organized within their own galleries. 

It is such a rewarding experience to see this project inspire students to look at the [art] world through a different lens. When this project was released on January 1, 2014 the primary intent was to introduce our readership to contemporary artists, studio cultures, and diversity in media from across the globe. It is neat to see this project implemented within a secondary art curriculum and to see the possibilities unfold. – Mr. Juarez, art educator and founder of 365 Artists 365 Days Project.

________________________________________________________________________________

Ms. Elyse Lucas’s unit: Design it Yourself Gallery Project

Unit and images courtesy of the teacher and used with permission. 

Objective: Design your own art exhibition in your own imaginary gallery. The artwork and gallery space must work together to invoke a common theme. Students may select any contemporary art pieces from the list of contemporary artists on Frank Juarez “365 Artists in 365 days” website. Students may design any space that the artwork will be hung. Student will create 3D models of their gallery space as well as an exhibition guide showcasing their selected artwork and describing their theme. Student will then present their ideas to professional curator Kate Mothes. Student will gain a greater understanding of contemporary art, art appreciation, art criticism, and the value to art in a community.

Requirements:

Research on Artwork

  • Select 8-12 pieces of contemporary art from Frank Juarez’s website “365 Artists in 365 Days”
  • Artwork must have common theme (aesthetically or message)
  • Describe artist’s intent with artwork (chart)

3D Model of Gallery

  • Must be made out of cardboard
  • Must be 3D and painted white
  • Must be laid out with where artwork goes and why

Exhibition guide for show

  • Must include mission statement about the show (intent or what message you want the viewer to observe)
  • Paragraph about each artist and description of their artwork

Presentation

  • About 20 minutes long
  • Re-state mission statement and intent with the show
  • Explain why you designed the space in a certain shape
  • Explain why you hung artwork in certain spots
  • Explain what you learned through this process

Standards:

  • Art Theory: Visual Thinking : Vocabulary Use (id:9968)
  • Art Theory: Visual Thinking : Interpretation/Evaluation (id:9969)
  • Art Theory: Visual Thinking : Formulates Opinion (id:9971)
  • Art Theory: Visual Thinking : Personal Opinion (id:9974)
  • Communication Arts 9. : Key Ideas and Details 2 (id:10151)
  • Communication Arts 9. : Production and Distribution of Writing 2 (id:10167)
  • Communication Arts 9. : Presentation of Knowledge and Ideas 3 (id:10177)

________________________________________________________________________________

Design it yourself Art Gallery: Research

Directions: Visit Frank Juarez’s website “365artists365days.com.” Click on the “Artist Database” link at the top and then “Download 2014/5 Artist Database” link. You can choose to look up an artist based on their medium (materials they used to make art) or theme/category they fall under. Visit the artist’s website, find images of their work, read about their intent/process. If you like an artist or think it works with a theme, add information to the chart below. Explore all sorts of artists, themes and mediums until you find one you appreciate/find aesthetic connection to. Collect 8-12 pieces for your show and print thumbnail picture of each piece.

Researching Artists-Artwork

Design it yourself Art Gallery: Research

Post-Research Reflection: Respond to the following prompts thoughtfully and thoroughly. Based on your reflection, write your show’s “Mission Statement” below.

  • What is similar about all these artists?
  • What mediums are the works made of? Where are the artists from?
  • What overall theme does the artwork have (aesthetics or meaning)?
  • Why will these works make a unified show?
  • What do you hope the viewer will take away from visiting your show?
  • What did you learn about your own aesthetics/taste in art through this research process?

________________________________________________________________________________

DIY Gallery: Community Engagement Piece

Directions: Design a community engagement piece to accompany your exhibition. What is something that will greet the public and encourage them to have a voice about your art show’s theme? Engagement piece should be something interactive that either remains in the gallery or people can take with them. Be creative and build off of your theme!

Requirements:

  • Piece should relate to the theme of your art show
  • Piece should be interactive
  • Prompt people to participate (see/feel the impact)
  • Remain in space or people take with them (memory)
  • Quick activity (less than five minutes)
  • Minimal supplies/mess

Ideas to build off of and adapt to your show:

  • Writing prompt (Kate’s show)
  • Collaborative drawing (Tedx talk)
  • Collaborative sticky notes mural (Tedx talk)
  • Take away card/gift/message (Felix Gonzalez Torres)
  • Be Creative!!! Think of your own!!!

Describe your community engagement piece below:

  • Describe the activity in 5-7 sentences (include a sketch as necessary)
  • What do you want people to take away from the activity?
  • What materials are necessary to the activity?
  • How does the activity relate to your theme?

Describe your community engagement piece below:

  • Describe the activity in 5-7 sentences (include a sketch as necessary)
  • What do you want people to take away from the activity?
  • What materials are necessary to the activity?
  • How does the activity relate to your theme?

________________________________________________________________________________

Design it yourself Gallery: Exhibition Guide

Directions: Create your own exhibition guide for your art show. Exhibition guide should walk your viewers through your art show and provide them with necessary information so they understand your theme/message of the show and layout of your gallery. Students may use Indesign or Publisher to create their 2-3 page guidebook.

IMG_20160421_0003

IMG_20160421_0002

Requirements:

Exhibition guide with likely be a trifold or booklet and must include the following:
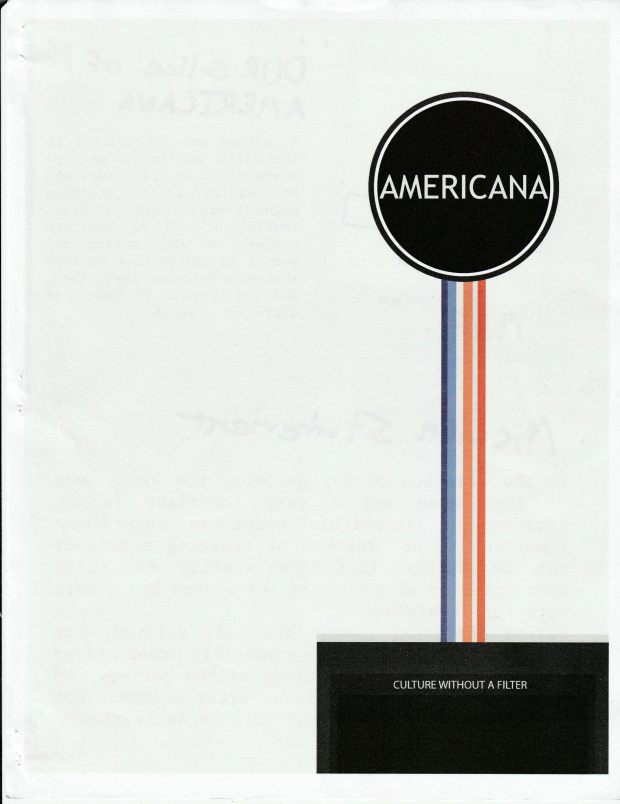
Title/Cover Page:

  • Title of your gallery
  • Title of your art show
  • Picture (one attractive piece of artwork that represents the show)

Information about the show:

  • Location (imaginary location-city, state)
  • Run time (imaginary dates-2 weeks, 2 months, other)   
  • Mission statement of show
  • Map of the gallery/digital Homestyler.com model

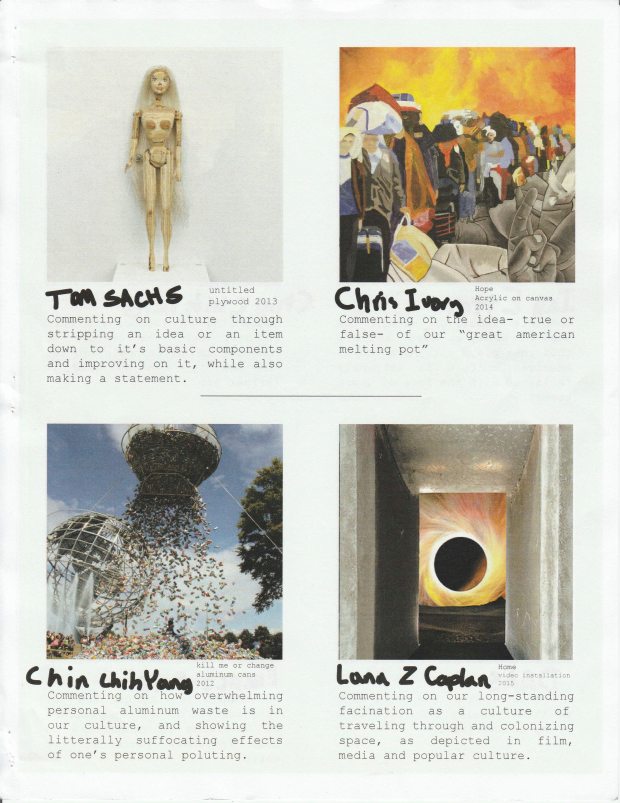
Information about the art:

  • Artist, Title, Date, Medium of every piece of art in show
  • Small paragraph/blurb about each artist and their piece
  • Selective photos of work (not for every piece but range of work)

Information about your gallery:

  • Who are the curators (that’s you!)
  • Why did you choose to design your gallery the way you did?
  • What future shows would you like to hold in your gallery?

Note: Please use an attractive layout, font, colors and visuals that all work with your art show’s theme and is inviting to the public.

IMG_20160421_0003

IMG_20160421_0002

________________________________________________________________________________

DIY Gallery: Model

IMG_7709Objective: Design a model of your gallery space that help articulates your gallery’s mission statement and showcases the selected artwork. One model should be completed digitally with http://www.homestyler.com. You will need to create an account with your school email for this site. One model should be 3D and made out of cardboard. Students should paint cardboard white and include a key for the model explaining where artwork will go. Research other art galleries and museums and consider their layout when designing your own. Consider traditional elements of a gallery including blank slate layout (white walls, wood floors, artwork as focal point). Consider sizing of artwork when planning what pieces go where (an instillation piece should have adequate space for viewer to walk around piece, 6ft painting will need larger wall so work has space, etc.)

Requirements:

  • 1 Model should be made digitally with homestyler.com
  • 1 Model should be constructed 3D
    • Made out of cardboard and hot glue
    • Painted white walls
  • Clear simple layout (complements the art)
  • Considerate arrangement of work (pieces thematically tell story)
  • Artwork sizing considered
  • Key/chart:
    • indication where artwork is hung
    • compass/label for bearings
    • title of the gallery
    • mission statement of gallery
    • thumbnail picture of art pieces (8-12)
    • statement explaining gallery design and layout (why pieces go where)

DIY Gallery: Model statement

Explain your thought process is designing the gallery space. Why did you choose this layout? How does the layout relate to your gallery’s mission statement and theme of the art show? What other art galleries/museums did you look at for inspiration for your gallery? What pieces needed extra consideration for placement? (7-9 sentences at least)

________________________________________________________________________________

Design it yourself Gallery: Presentation

Directions: Pitch your gallery idea to Kate Mothes and Ms. Lucas! Presentation should be 15 mins in length and both partners should be actively participating equally. Discuss all components to your gallery including the following: information about the show, art pieces/research process, exhibition guide, layout (digital and scale model), community engagement piece.

Information on show: (3 mins)

  • Title of gallery and exhibition
  • Mission statement
  • Theme of the exhibition
  • Describe artists and their pieces (artist, title, date, medium, meaning)

Research process: (3 mins)

  • Why did you pick the pieces you did?
  • What were some hardships with finding your artists?
  • Why were you drawn to the pieces?
  • What did you learn about your own taste in art through this process?

Exhibition Guide: (3 mins)

  • Why did you design your guide this way?
  • What hardships did you have when creating your guide?

IMG_20160421_0002

IMG_20160421_0003

IMG_20160421_0004

IMG_20160421_0005

Layout of gallery (models): (3 mins)

  • Why did you arrange your model/gallery layout this way?
  • What hardships did you overcome in planning out the location of your pieces or what special considerations did your artwork require?

IMG_7649

Community Engagement: (3 mins)

  • What activity did you provide the public?
  • What are you hoping people take away from participating in activity?
  • How does your activity relate to your theme?
  • Why is it important to have a community engagement piece?

*** Note: This is a formal presentation. Please introduce yourself and conduct yourself professionally in front of our community members. Please rehearse your presentation with your partner in advanced so you meet time and response expectations. Please hold up/display model and guide when describing these pieces. Can provide powerpoint of enlarged images when describing art pieces if desired.

Presentation Feedback (see front of this sheet also):

________________________________________________________________________________

________________________________________________________________________________

________________________________________________________________________________

________________________________________________________________________________

________________________________________________________________________________

Project Feedback (see individual sheets also):

________________________________________________________________________________

________________________________________________________________________________

________________________________________________________________________________

________________________________________________________________________________

________________________________________________________________________________

Unit and images courtesy of the teacher and used with permission. 

Below is the article that was published on April 11, 2016 by The Post Crescent. 

IMG_20160421_0004

IMG_20160421_0003

IMG_20160421_0002